🔥 Launch offer: use code LAUNCH75 for 75% off your first week or month
📚 Study smarter with HWSolved — McGraw Hill, Canvas, ALEKS, Quizizz, Coursera & more
⚡ Starter from $6.99/wk · Pro from $11.99/wk · Elite from $17.99/wk
🎟️ Or use code HW20 for 20% off any plan
🚀 Upgrade anytime — new features unlock instantly, no restart needed
Set up your HWSolved Lockdown Bundle
Follow these steps in order. It takes about 10 minutes. You use two computers: your exam PC (runs the exam) and your laptop (runs HWSolved Pro). Answers appear only on your laptop.
What's in the box
- 📺DICHEN HDMI FuserMerges two screens onto one monitor
- 🎥USB HDMI Capture CardFeeds the exam screen to your laptop
- 🖱️MAKCU Mouse TriggerPlatinum & Ultimate bundles only
- 🔌3x HDMI CablesFor the fuser connections
- 🔗DisplayPort-to-HDMI CableExam PC GPU to the capture card
Software-only customer? Skip to Software Setup — you don't need any of the hardware above.
Fuser setup
The fuser blends your exam PC and your laptop onto one monitor. Use the included HDMI cables.
- Plug your exam PC's HDMI into the fuser's
INPUT 1. - Plug your laptop's HDMI into the fuser's
INPUT 2. - Plug the fuser's
OUTPUTinto your monitor.
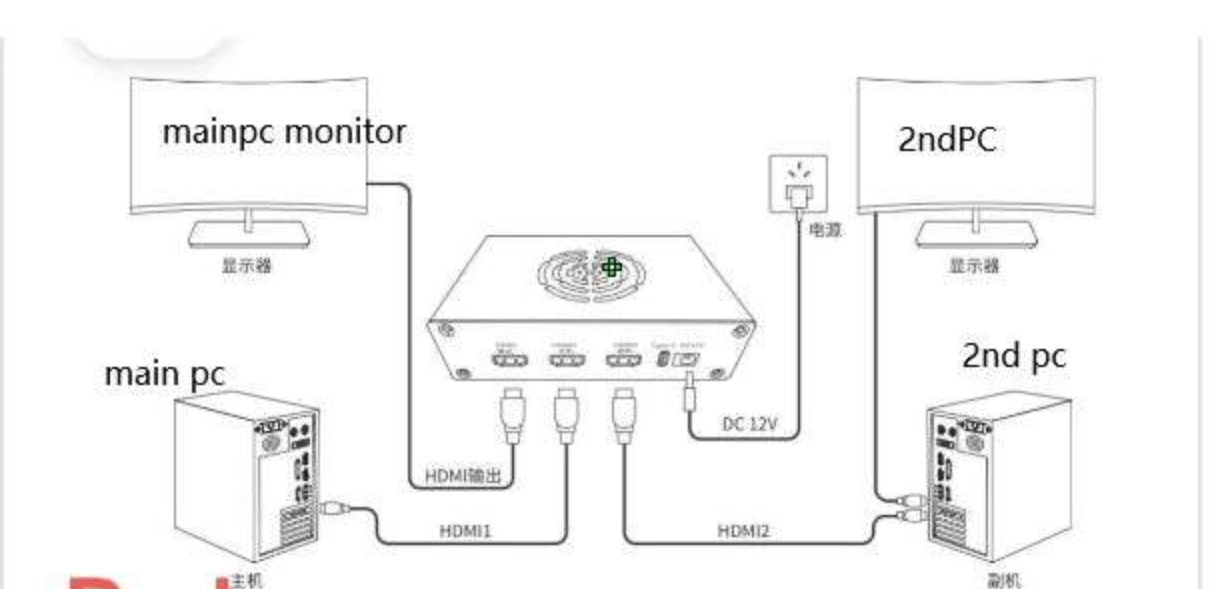
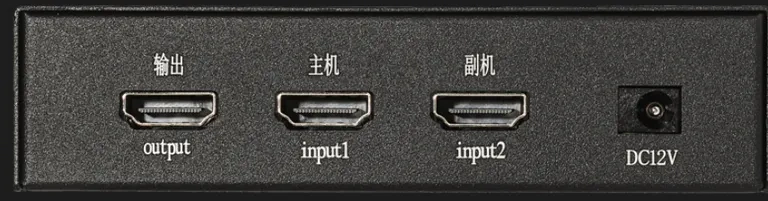
Same wiring as any standard DMA fuser (output to monitor, input 1 to the main PC, input 2 to the second PC). If you've followed a Clockwork DMA fuser guide before, it's identical. Use HDMI 2.0 cables.
HDMI capture card setup
This sends a copy of your exam screen to your laptop. It's plug-and-play — no drivers.
- Plug one end of the DisplayPort-to-HDMI cable into your exam PC's graphics card (GPU).
- Plug the other end into the HDMI input on the USB capture card.
- Plug the USB capture card into a USB port on your laptop.
MAKCU setup Platinum & Ultimate only
The MAKCU lets you trigger an answer with your mouse's forward button. No MAKCU in your bundle? Use the Right Alt key instead — skip to Software Setup.
- Plug your mouse into the MAKCU.
- Plug MAKCU USB 1 into your exam PC.
- Plug MAKCU USB 2 into your laptop.
This is the standard MAKCU three-cable layout (mouse into the device, one cable to each PC) — the same wiring shown in Clockwork DMA's MAKCU guide. Your mouse still works on the exam PC exactly as normal.
Software setup on your laptop
- Download and unzip HWSolved Pro from the link in your email into a folder you'll keep.
- Double-click
CustomerSetup.bat. It installs everything automatically and checks your hardware. Wait for it to finish (2-3 minutes, first time only).
First launch
- On your exam PC: right-click the desktop, open Display settings, and set it to Duplicate these displays.
- On your laptop: launch
HWSolvedPro.exe. - Enter your license key and click Activate.
- When asked to choose a source, select Capture Card.
Using it during the exam
- Press the MB5 forward button on your mouse for an instant answer,
- or press the Right Alt key on your laptop.
- The answer appears in the overlay on your laptop screen only.
The Lockdown Browser on your exam PC cannot see or detect any of this — everything happens on your laptop.
Troubleshooting
- Black screen / no answerMake sure your exam PC display is set to Duplicate these displays (First Launch, step 1).
- MAKCU not detectedClose any DMA software that may be holding the COM port, then relaunch HWSolved Pro. The Right Alt key always works as a backup.
- License key not workingDouble-check the key against your email, including any activation instructions there.
- Still stuck?Open a support ticket at hwsolved.net or ask on Discord — we'll get you sorted fast.
Need a hand?
Our team helps you get set up. Reach out any time.